Creating a Mac OS X Service
2010-11-01Introduction
I was back working in OS X the other day and got to thinking about an often underused portion of the operating system: Services. Services provide the user with contextual operations: working with text, images, and so forth. One that Apple provides is to highlight a word and, in the context menu or the application’s services menu (i.e., Safari > Services), you will be provided with an option to look the word up in the dictionary.
Wanting yet another example of how easy it is to implement the Accentuate.us API, I decided to take on the task and implement an Accentuate.us OS X Service myself. Note that at the moment it is still under development, so it only accentuates into Irish for testing purposes.
Background
I was disappointed by the documentation that I found online. Although Apple’s developer documentation did prove useful once the project was underway, I felt that there was too little detail about setting up the project itself within Xcode, which led to much undue frustration. I found much detail online about helper utilities to make services, but little material on coding my own, except for CocoaDev’s making services, which had the same issue of not discussing the setup of the Xcode project itself, and Simone’s very detailed walkthrough. Unfortunately, after following Simone’s step-by-step, I encountered the note at the end of the post admitting that “the bundle doesn’t actually work,” which was slightly important to the project. There was a workaround mentioned that involved compiling two different targets, but I found that unnecessary and document the solution within this post.
It is important to reiterate that the three services mentioned brought me close to what I needed, but all lacked in explaining the setup itself or did so in an unfavorable way, which is what I will correct in this part of the series. This will successfully lay the foundation for creating an OS X service and get it to the point that it can lowercase any selected text. In subsequent posts, we will dig deep with the Accentuate.us API and see just how easy it is to make a system-wide utility to accentuate or process selected text in a way you desire!
Setup
Actually configuring the project in Xcode was the area that I found most difficult, so for your benefit, I will err on the side of caution and be overly detailed.
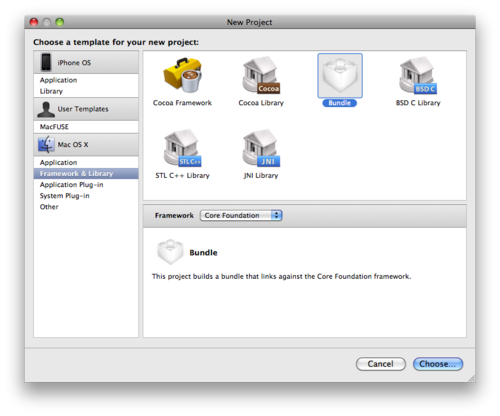
Create a new Xcode project and under the Mac OS X pane on the left, select Framework & Library. Choose Bundle with the Core Foundation framework and save it as AccentuateUsService.
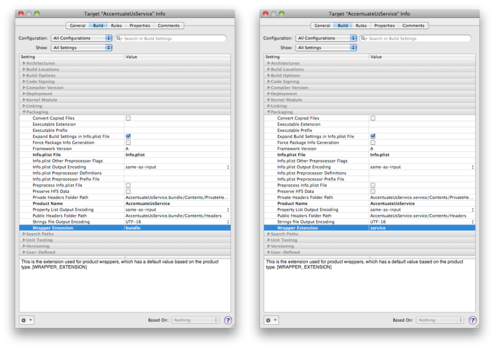
The first problem is that the default bundle is called AccentuateUsService.bundle, but we need it to be AccentuateUsService.service. Go to Project > Edit Active Target "AccentuateUsService"... and select the Build tab. Under the Packaging category, change the Wrapper Extension settings from bundle to service.
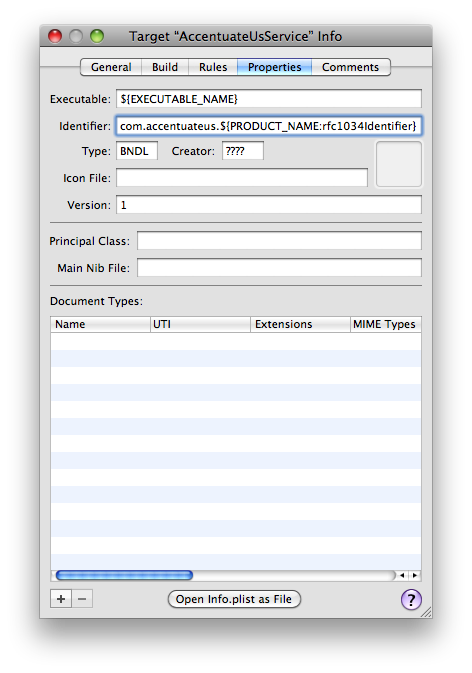
While we’re in the target info, switch over to the properties tab and change the Identifier field to read com.accentuateus.${PRODUCT_NAME:rfc1034Identifier}, which turns out after parsing to be com.accentuateus.AccentuateUsService. This will be useful in a subsequent post.
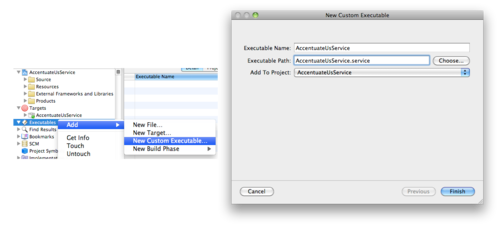
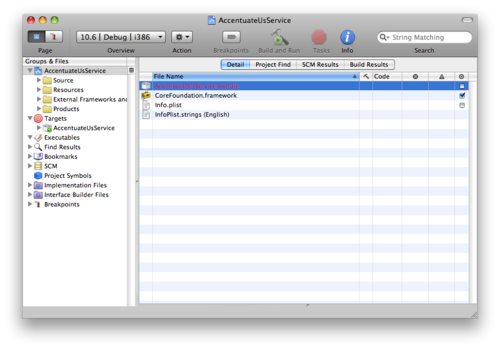
The next problem to tackle is the need for an executable, otherwise the logic for handling the selected text is nonexistent in the build. You can do this by right clicking on the Executables group and selecting New Custom Executable... under the Add menu, which you should fill out as pictured above (AccentuateUsService for the executable name, AccentuateUsService.service for the path).
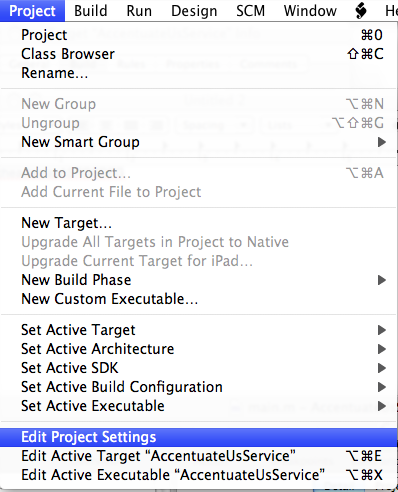
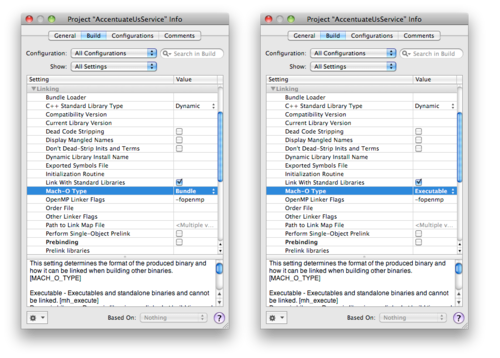
Though the executable exists, the binary file at this stage will be useless. To change this, navigate to the Project menu and select Edit Project Settings. Under the Build tab, beneath the Linking category, change Mach-O Type from Bundle to Executable.
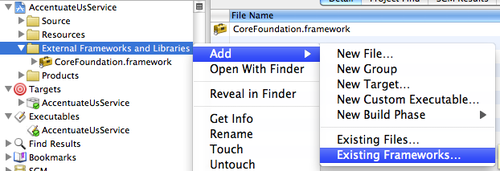
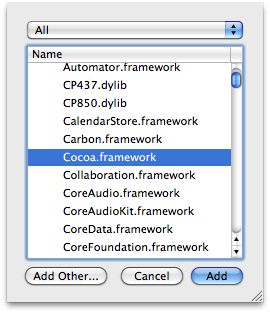
Our work in this service depends on the Cocoa framework, so right click the External Frameworks and Libraries group and navigate to Existing Frameworks... under the Add menu. Select the Cocoa.framework entry and click Add.
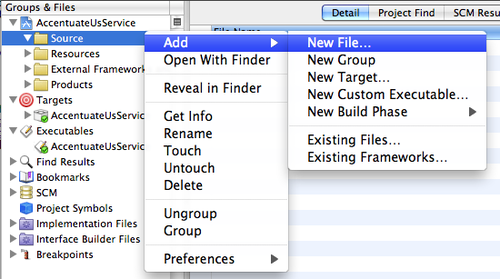

Now, we’re getting to the fun part! We need to add our first source file, main.m, which will hold the logic to register the service with OS X. Under AccentuateUsService’s Source group, navigate to New File... beneath Add. We’ll want to navigate to the Mac OS X Cocoa Class entry in the left pane and then select the Objective-C class as a subclass of NSObject. The file name is main.m and we do not need a header file, so uncheck that box. All other fields can stay at their default, so click Finish.
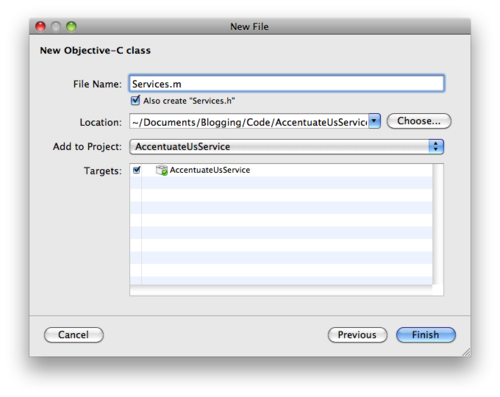
We also need a place for the service logic. Although this could be done also in main.m, or main.m’s logic could be in this Service class, I like to separate them out. Follow the same steps as above, but this time use the file name Services.m and do check the Also create "Services.h" box.
main.m
1#import "Services.h"
2
3int main(int argc, char *argv[]) {
4    NSAutoreleasePool *pool = [[NSAutoreleasePool alloc] init];
5    Services *service = [[Services alloc] init];
6    NSRegisterServicesProvider(service, @"AccentuateUsService");
7
8    NS_DURING [[NSRunLoop currentRunLoop] run];
9    NS_HANDLER
10    NS_ENDHANDLER
11
12    [service release];
13    [pool release];
14
15    return 0;
16}
In main.m we initialize the below-implemented Service class and register it with the services provider, making service calls possible.
Services.h
1#import <Cocoa/Cocoa.h>
2
3@interface Services : NSObject {
4}
5
6- (void)accentuate:(NSPasteboard *)pboard
7          userData:(NSString *)data
8             error:(NSString **)error;
9
10@end
In Services.h, we simply define the accentuate method signature. Note that while the first argument, accentuate, may be whatever you please, both userData and error must remain that. The custom accentuate term, although it may be whatever you desire, must match with Info.plist’s NSMessage, as discussed later.
Services.m
1#import "Services.h"
2
3@implementation Services
4- (void)accentuate:(NSPasteboard *)pboard
5          userData:(NSString *)data
6             error:(NSString **)error {
7	NSString *text;
8	NSArray *types;
9
10	types = [pboard types];
11
12	// Problem with supplied data
13	if(![types containsObject:NSStringPboardType]
14       || !(text = [pboard stringForType:NSStringPboardType])) {
15		*error = NSLocalizedString(@"Error: Pasteboard doesn't contain a string.",
16                                   @"Pasteboard couldn't give a string.");
17		return;
18	}
19
20	// Error working with text?
21	if(!text) {
22		*error = NSLocalizedString(@"Error: Couldn't accentuate text $@.",
23                                   @"Couldn't perform service operation.");
24		return;
25	}
26
27    // Set new text
28	types = [NSArray arrayWithObject:NSStringPboardType];
29    [pboard clearContents];
30	[pboard declareTypes:types owner:nil];
31    text = [text lowercaseString];
32    [pboard writeObjects:[NSArray arrayWithObject:text]];
33
34	return;
35}
36
37@end
Services.m is where the magic happens–it is the logic for accentuate, the method through which all service calls pass. We first check that types does indeed contain an object matching one of NSSendTypes’ entries (discussed later when speaking of Info.plist) and that we can extract the supplied text from it. This is particularly useful for handling the processing of multiple types of data, although that is not covered in this particular post. To be safe, we also check that text has been set, otherwise throw an error and abort.
After we are sure that we have been provided well-formed data, we clear pboard and process the text. In this case, we are simply calling lowercaseString which, intuitively, provides a lowercased version of the string. We will in the next post be replacing this with a different call that actually accentuates the text.
After all is said and done, the processed text is written to pboard. That’s all there is to it!
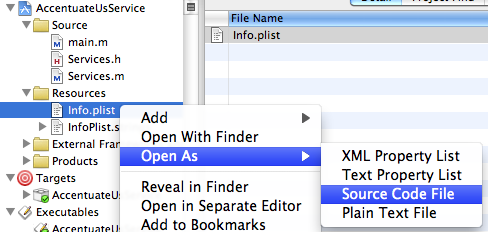
We’re getting close to finish. The next step is to make sure OS X can have an easy time finding your service, so for that we’ll need to modify the Info.plist file found under AccentuateUsService's Resources group. Right click and select Source Code File under Open As to follow along directly as I do here. You can edit it in the other modes as well, but I prefer this.
Info.plist
1<?xml version="1.0" encoding="UTF-8"?>
2<!DOCTYPE plist PUBLIC "-//Apple//DTD PLIST 1.0//EN" "http://www.apple.com/DTDs/PropertyList-1.0.dtd">
3<plist version="1.0">
4<dict>
5	<!-- ...Source above redacted for brevity -->
6	<key>CFPlugInUnloadFunction</key>
7	<string></string>
8
9	<!-- new material -->
10    	<key>LSBackgroundOnly</key>
11	<string>1</string>
12	<key>NSServices</key>
13	<array>
14		<dict>
15			<key>NSKeyEquivalent</key>
16			<dict>
17				<key>default</key>
18				<string>X</string>
19			</dict>
20			<key>NSMenuItem</key>
21			<dict>
22				<key>default</key>
23				<string>Accentuate Text</string>
24			</dict>
25			<key>NSMessage</key>
26			<string>accentuate</string>
27			<key>NSPortName</key>
28			<string>${PRODUCT_NAME}</string>
29			<key>NSReturnTypes</key>
30			<array>
31				<string>NSStringPboardType</string>
32			</array>
33			<key>NSSendTypes</key>
34			<array>
35				<string>NSStringPboardType</string>
36			</array>
37		</dict>
38	</array>
39        <!-- end new material -->
40</dict>
41</plist>
The property values are fairly self-explanatory or well documented in the Mac OS X Reference Library, but I’d like to highlight just a few:
LSBackgroundOnlykeeps the application from appearing in the Dock.NSMessageis a key item, so I’ll say it again:NSMessage. Earlier we named a method in Services.h calledaccentuate, or whatever silly name you chose while following, and this must be the same.NSPortNameis another important entry. I set its value to ${PRODUCT_NAME}, which resolves to AccentuateUsService, because I used that earlier in main.m.
Installation
Phew, we’re done with the setup! In future posts, now that this foundation has been laid, we’ll be able to jump straight into code, but for now it is time to test out our brand new service!
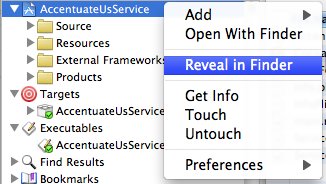
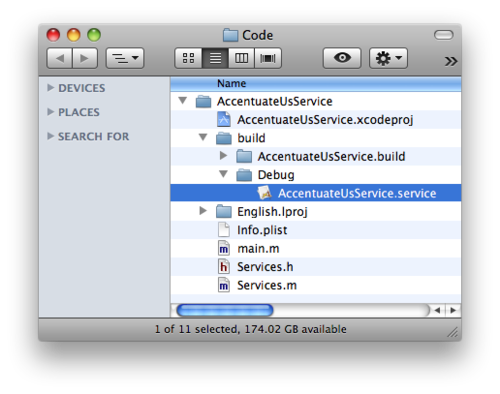
You can navigate easily to the code’s folder by right clicking on the AccentuateUsService group and selecting Reveal in Finder. Navigate to AccentuateUsService/build/Debug/. Open a new finder window (⌘N) and go to the folder (⇧⌘G) ~/Library/Services/.
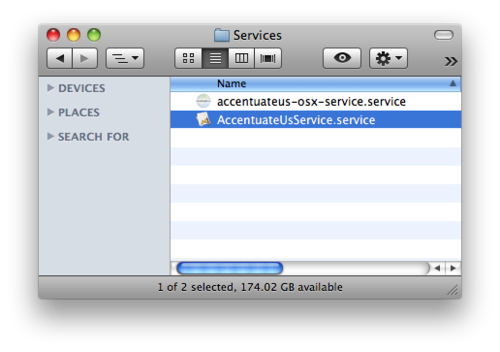
Copy the AccentuateUsService.service file from the first finder window (in Debug) to the Services folder. You will now need to either log out and back in again or open Terminal (/Applications/Utilities/Terminal.app) and run
$ /System/Library/CoreServices/pbs -dump_pboard |grep AccentuateUsService
This will force OS X to reregister any available services and save you the trouble of login cycling. I added the grep just because -dump_pboard outputs so much contextually irrelevant information.
Please note well that pbs is not guaranteed to stay in OS X and is subject to change functionality, move, or be removed entirely, but it is great for testing.
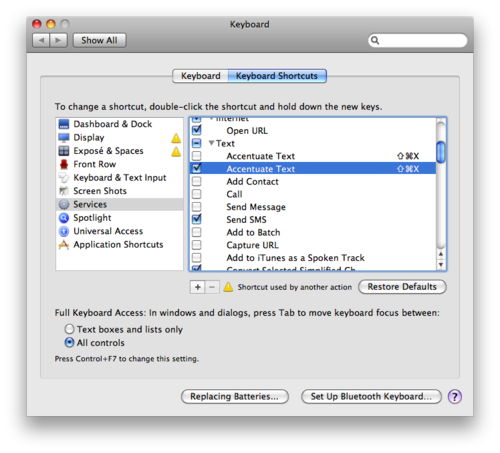
Next you will need to tell OS X that it’s okay to actually display this new service. Navigate to Services under the Application’s menu (i.e., Finder > Services) and choose Services Preferences.... Under the Keyboard Shortcuts tab, navigate to the Services pane (left) and check Text > Accentuate Text.
Demo
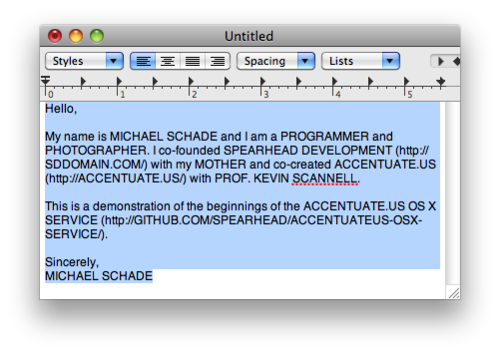
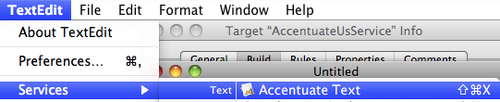
This is my favorite part: demo time! For this, I open Apple’s TextEdit and type a very important letter to my guests, who are unfortunately averse to caps. Thankfully, we wrote this wonderful service that lowers the case of all selected text! Go to the application’s menu and select Accentuate Text under the Services submenu (TextEdit > Services > Accentuate Text).

If all goes well, your letter should be caps free and your guests quite happy indeed!
Wrap-Up
As noted, this particular installation of the Accentuate.us service posts was more detailed than perhaps necessary because I found a few key steps of the setup in Xcode to be undocumented or at least extremely difficult to find and did not want you to suffer as I did. In the next installment, we’ll dive right in with some more code and get a first-hand account of just how easy the Accentuate.us API is.
michael schade
I like learning new things. Previously: Kenchi founder, eng & ops teams at Stripe from 2012-2019. Say hi! 🏳️🌈